Toyota Corolla: If you have a flat tire (vehicles without spare tire) / Before repairing the tire
Toyota Corolla 2019-2026 Owners Manual / When trouble arises / Steps to take in an emergency / If you have a flat tire (vehicles without spare tire) / Before repairing the tire
- Stop the vehicle in a safe place on a hard, flat surface.
- Set the parking brake.
- Shift the shift lever to P (continuously variable transmission) or N (manual transmission).
- Stop the engine.
- Turn on the emergency flashers.
- Check the degree of the tire damage.
A tire should only be repaired with the emergency tire puncture repair kit if the damage is caused by a nail or screw passing through the tire tread.
- Do not remove the nail or screw from the tire. Removing the object may widen the opening and make emergency repair with the repair kit impossible.
- To avoid sealant leakage, move the vehicle until the area of the puncture, if known, is positioned at the top of the tire.
■ A flat tire that cannot be repaired with the emergency tire puncture repair kit
In the following cases, the tire cannot be repaired with the emergency tire puncture repair kit. Contact your Toyota dealer.
- When the tire is damaged due to driving without sufficient air pressure
- When there are any cracks or damage at any location on the tire, such as on the side wall, except the tread
- When the tire is visibly separated from the wheel
- When the cut or damage to the tread is 0.16 in. (4 mm) long or more
- When the wheel is damaged
- When 2 or more tires have been punctured
- When 2 or more sharp objects such as nails or screws have passed through the tread on a single tire
- When the sealant has expired
 If you have a flat tire (vehicles without spare tire)
Your vehicle is not equipped with a spare tire, but instead is equipped with
an emergency tire puncture repair kit.
A puncture caused by a nail or screw passing through the tire tread can be repaired
temporarily using the emergency tire puncture repair kit...
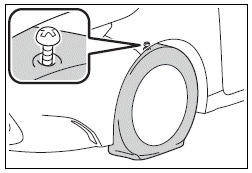
 Location of the emergency tire puncture repair kit and towing eyelet
A - Emergency tire puncture repair kit
B - Towing eyelet..
Other information:
Toyota Corolla 2019-2026 Owners Manual: Rear seats
The seatbacks of the rear seats can be folded down. Folding down the rear seatbacks 1 Move the front seats forward. (®P.133) 2 Stow the rear armrest. (if equipped) (®P.443) 3 Seats with an adjustable type head restraint: Lower the head restraints to the lowest position. (®P.136) 4 Fold the seatback down while pushing the seatback lock release button. Each seatback may be folded separately. WA..
Toyota Corolla 2019-2026 Owners Manual: “Setup” screen
“Setup” screen Press the “MENU” button, then select “Setup” to display the “Setup” screen. The items shown on the “Setup” screen can be set. A - Select to change the selected language, operation sound settings, etc. B - Select to set Bluetooth® device and Bluetooth® system settings. C - Select to set audio settings. D - Select to set the phone sound, contacts, message se..
Categories
- Manuals Home
- 12th Generation Corolla Owners Manual
- Lubrication system (2.0 L 4-cylinder [M20A-FKS] engine)
- Opening the trunk
- Lubrication system (1.8 L 4-cylinder [2ZR-FAE] engine)
- New on site
- Most important about car
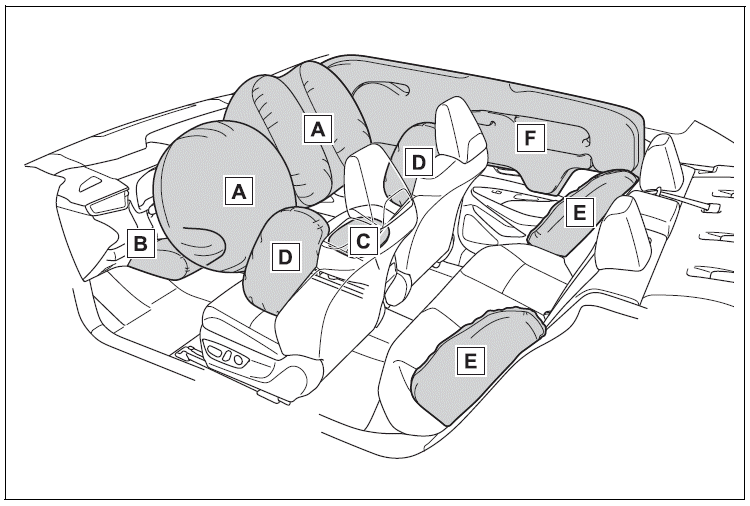
SRS airbags
The SRS airbags inflate when the vehicle is subjected to certain types of severe impacts that may cause significant injury to the occupants. They work together with the seat belts to help reduce the risk of death or serious injury.
SRS airbag system
■ Location of the SRS airbags
Copyright © 2026 www.tocorolla12.com